Your contact
Do you have any questions about your PEAQ product or do you want to report a fault? We’ll put you in touch with the right customer service point by phone or email. All you have to do is select your product – for tablets and notebooks, please also indicate your model.
FAQ
Do you have a question about a PEAQ product? Here you can find the answers to frequently asked questions!
Televisions: The serial number can be found at the back of the unit.
All documents for your PEAQ product (e.g. manual, product data sheet) can be downloaded here as free PDFs.
For more information on the warranty period and conditions, please refer to the warranty card included with the product.
We ensure compliance with high social standards when manufacturing our PEAQ products.
The core labour standards of the International Labour Organization (ILO) form an integral part of our contracts. Since 2004, IMTRON GmbH has also been a member of the Business Social Compliance Initiative (BSCI), which was established to safeguard workers’ rights at production facilities. Some of the core elements checked within the initiative include our corporate management practice, aspects of environmental protection, occupational health and safety, and potential violations regarding the prohibition of child and forced labour. The BSCI’s Code of Conduct is based on the SA8000 standard established by Social Accountability International (SAI): Its members are obliged to regularly arrange external audits of their suppliers and meet other requirements within the scope of the initiative.
IMTRON GmbH sets the highest standards for safety, quality, health and environmental protection when developing and manufacturing its products. Our top priority is to ensure the highest possible level of product safety for our customers.
Therefore, we commission an independent and accredited testing institute to conduct stringent safety tests on all our devices before and after production. We are aware of our responsibility and therefore ensure that our end customers only ever receive flawless products.
You can set your favourites after registering at https://smartradio.frontier-nuvola.net/.
You can also save and edit your favourites there.
Each customer can take the following steps to obtain an access code: Menu -> Internet radio -> stations -> Other / Help.
More information can be found in the manual.
This information is transmitted by radio stations themselves. If a radio station doesn’t transmit the information, it cannot be displayed on the radio.
The Internet radios use the 2.4 GHz WiFi system. The 5 GHz option is not available.
This is unfortunately not possible. The product only has an audio input function.
No. The remote controls are not compatible with one another.
No. This sound cannot be adjusted or changed.
The symbol on the right shows the WiFi connection; the DAB signal strength is indicated in the middle; and the volume (or stereo / mono audio) is shown on the left.
USB sticks can easily be detected up to 8 GB.
SD cards can easily be detected up to 32 GB.
If you would like the monitor to stay on permanently, please set the timer to 00.
Please take the following steps:
Settings -> System -> Reset options -> Delete all data (factory settings) -> Reset tablet
To disable the 4 hour shutdown:
- Turn on the monitor and press the multifunction switch to the right to enter the Reset menu. In the submenu, select Off Timer and press right to set the time to OFF. Press down to select OFF. This warning message then appears.
- Click up or down again to confirm with YES*.
- Click to the right again to confirm the entry. You will then be taken to the submenu again. Here, press the multifunction switch to the right and then click down until OFF appears. Confirm the entry by clicking to the right.
* If they confirm with YES, here monitor will have higher power consumption.
This setting must be made in the control panel of the laptop.
For Windows: Start > Settings > System > Power & Sleep > Additional Power Settings > Choose what to do when you close the computer > When you close it > Do nothing.
This setting must be made in the control panel of the laptop.
For Windows: Start > Settings > System > Screen
A wall mount is required to mount the monitor on a wall. All PEAQ monitors comply with the VESA standard.
The tilt adjustment is possible on all PEAQ monitors.
1. The battery level may be too low. Try turning on your tablet after it has been charging for more than 30 minutes.
2. Press the power button briefly to check if the tablet is in sleep mode.
3. Press and hold the power button for 7-8 seconds to restart the tablet.
4. Press the reset button with a stylus to restart the tablet.
1. Make sure the USB cable is properly plugged into the charging port.
2. Try using a different compatible USB cable and adapter.
1. Make sure that the Wi-Fi in your tablet is turned on.
2. Make sure that you enter the correct password when you connect the Wi-Fi.
3. Restart the router. This will renew the connection with the tablet and often fix the problem.
1. Make sure that the "Bluetooth" radio is turned on in the "Wireless & Networks" settings menu.
2. Make sure the device you want to connect to is set to discoverable.
3. Go to the "Bluetooth Settings" and select "Search for Nearby Devices". Then press "Search for devices".
4. When the device is found, you should be prompted to enter a PIN number to pair the device.
1. This often has to do with grease, oil or dust buildup on the screen or in your fingers.
2. Wipe the screen with a dry cloth and make sure your fingers are clean as well.
1. Go to screen selection in Android settings and enable "Auto-rotate screen" or press the "Auto-rotate" button on the front of the device.
1. Make sure you are using the USB cable that came with the tablet and that it is connected to the tablet's micro USB port.
2. The tablet should appear in your "My Computer" screen.
1. Plug the power adapter into the wall socket and connect it to the tablet. The tablet should now turn on. We recommend charging the device for 8 hours before using it for the first time.
2. Leave a fully discharged device plugged in and turned off for at least 12 hours.
Sometimes the entire screen freezes or the app refuses to shut down. Sometimes you are notified that the app is not working, and sometimes it is not.
If an app is not working, simply click the "Force Close" button to close the app. Wait a few seconds, open it again, and it should run normally again. To force close an app, just swipe it away in the multitasking menu.
If that doesn't work and the app keeps crashing, there may be another issue causing this problem. Developers release updates to their app to constantly improve it, and if you don't have automatic updates enabled, you may have to manually go in and update the app.
If you are running an older version of the app, this may be the reason why your app is not working properly. If this is indeed the reason, installing the update should fix this issue.
If you have music playing and now can't manage to turn it off, you may need to go back into the app to try pressing pause or stop. You can access playback controls through the app, on the lock screen, and sometimes in your notification area.
If this doesn't work, you can try shutting down the app, and if that doesn't work, you can try restarting your tablet.
If your Play Store doesn't connect, you won't be able to download new apps or install new updates to make sure your apps work properly.
If it doesn't load or run properly, you may need to clear your cache if it has been corrupted. To clear this, you can do so in the settings.
Once you are in the settings, you can go to:
1. apps
2. all apps
3. Google Play Store
4. storage
5. clear cache
After that, restart your tablet and the problem should be fixed.
If that doesn't work, you may need to clear the history. Go into the app and look for the three lines that should be in the top left corner.
Once you go into the settings in the app, just click on "Clear local search history" and your app should work again.
Initial set-up when using an external power source
1. Connect the external power supply unit to a suitable power source and the input socket on the TV set (no. 1 in diagram).
2. Move the battery switch (No. 2 in diagram) to the “I” (“On”) position and press the TV power switch (No. 3 in diagram).
3. Follow the instructions for the initial set-up on the TV set.
Initial set-up when using the integrated battery
Note: In general, initial set-up is recommended when using an external power source.
1. Move the battery switch (No. 2 in diagram) to the “I” (“On”) position and press the TV power switch (No. 3 in diagram).
2. Follow the instructions for the initial set-up on the TV set.
a. Battery switch: The switch only controls the battery connection!
I - To use the battery as a power supply and while the TV is in use (also with external power supply).
O - Battery is not being charged or used. Switch it to the O position if it is not used for a long period. When switched to this position, the TV can only be used with an external power source.
b. TV mains switch: The switch is used to switch the TV on/off.
a. Fully charge the battery
b. Switch off the TV, stow the remote control in the holder on the back, remove all non-mobile connections (e.g. SAT cable) and move the battery switch to “O.”
c. Pack the TV set securely for transport, e.g. in the sales packaging.
d. At the destination, move the battery switch to “I” and switch on the TV set using the mains switch or the remote control.
e. Connect the signal source (e.g. mobile antenna) or connect it to the mobile network.
a. Connect to hotspot or public network
b. Connecting an external antenna etc.
c. Connecting a USB stick with media
d. via screen mirroring
- The battery needs 2 hours to reach 50% of battery status -> afterwards, can be used without Power supply
- The battery needs 4 hours (TV not in use) to reach 100% of battery status
- The battery needs 10.5 hours (TV in use) to reach 100% of battery status
a. Open the Home screen
b. Select “Expand” in the app bar and then “Help.”
c. Select the “Battery” icon. The current battery status is now displayed
Yes. The battery can be obtained as a spare part from the customer advisory service. You will find the corresponding telephone numbers in the enclosed warranty card. Please note that incorrect self-repair can lead to hazards and loss of warranty and should be avoided in the case of doubt.
Yes. The power supply unit can be obtained as a spare part from the customer advisory service. You will find the corresponding telephone numbers in the enclosed warranty card. Please note that incorrect self-repair can lead to hazards and loss of warranty and should be avoided in the case of doubt.
The TV set may be used at an ambient temperature of -10°C to +40°C (humidity: 20-80%). We recommend you use the set in the shade to avoid overheating and to prevent the picture quality from being impaired by an excessively bright environment.
Use the TV on a flat, stable and non-slip surface. Make sure the environment is dry.
a. Move the battery switch to O when not in use for a long time.
b. Charge the battery immediately after using the battery as a power supply
c. Long press the shutdown button on the remote control in the shutdown mode to enter deep standby mode;
d. Do not use the TV in extremely high temperatures of more than 40℃;
e. The battery should be stored at room temperature and charged to 40% to 60% of its capacity. If long-term storage is needed, we recommend you charge the battery every six months to prevent over discharge;
f. When not in use for a long time, the battery should be charged for 1-2 hours first, then remove the battery from the device and place it separately to avoid metal contact with the battery causing short circuits or damage.
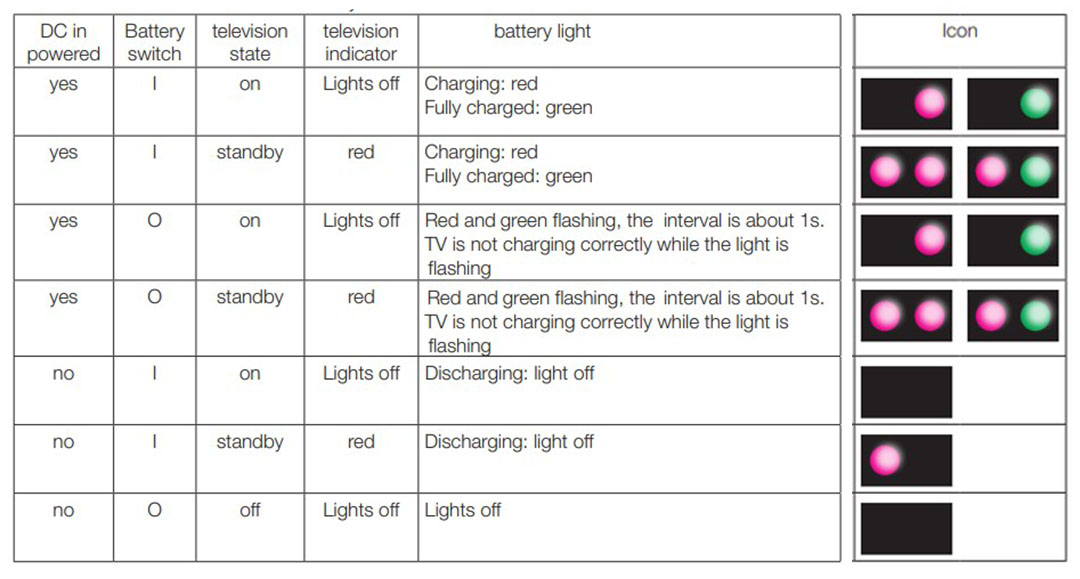
a. Red & green flashing: Error Move the battery switch to “I.”
b. Red & green lights continuously on: Battery is fully charged
c. 1x red light continuously on: The TV set is switched on
d. 2x red lights continuously on: The TV set is in standby mode
e. Signal lights are off: External power supply and battery are disconnected
This option is only available when LCN is switched off. We can use the channel swap function to swap two channels.
1. Press the buttons to open the TV options menu.
2. Press the arrow keys on the remote control, select the “Channels” option.
3. Press the arrow buttons on the remote control, select the “Channel Management” option and press the OK button to display the “Channel Management” sub-menu.
4. Press the arrow buttons on the remote control, select the “Channel Swap” option and press the OK button to open the “Channel Swap” sub-menu. Press the arrow keys on the remote control and press the OK button to define the two channels you want to swap.
1. Press the OK button to display the channel list.
2. Press the blue button to add or remove favourites.
3. Now press the OK button and then the yellow button to call up the “Select type” menu and then “Favourites.” The favourite channels are displayed here
Please contact the Customer Centre. In this case, have the code list of the universal remote control ready. You will find the corresponding telephone numbers in the enclosed warranty card.
Please refer to the “Connecting the antenna, internet and external devices” section in the operating instructions.
- Master Pin: 1225